Here to share Airbrush makeup through my eyes. This blog focuses on all things airbrush or airbrush related. May it inspire you as well as be inspired by you...
For more of my airbrush ventures
Like on Facebook: https://www.facebook.com/Iheartairbrush
Like and Follow on Pinterest : www.pinterest.com/iheartairbrush
Follow on Instagram: Tag Krysteanea
Subscribe on YouTube: https://www.youtube.com/IHEARTAIRBRUSH
This year I thought I would do 5 days of airbrush looks that compliment the Christmas season. Day 1 festive Christmas glam using classics Christmas shades in a soft yet glamorous light. For this look I used Ruby red, Sage green, and opal white with a jet black liner.
Here's how to get this look:
Step 1: Apply Ruby Red to the outter corner of the eye then drag it up to the transition and follow thrrough towards the inner corner of the eye staying in the transition.
Step 2: Apply Sage Green to the lid starting from the outer v of the eye all the way through to the inner corner of the lid. Then apply this color to the lower lash line staring at the outer corner towards the inner corner of the lower lash line.
Step 3: Apply Opal White to the tear duct, and then feather it on the inner lid towards the transition. Apply this color on the inner corner of the lower lash line blending it into the sage green Apply this color on the brow bone as well as a highlight
Step 4: Apply Jet Black Liner using the cat eye end stencil. You can find this stencil airbrushmakeup.com.
Optional Step 5: If ruby red is TOO BOLD FOR YOU you can tone it down by applying a foundation shade lighter than your normal foundation shade in light stroke over the ruby red. Careful not to over spray because you run the risk of covering it up completely.
To see how I applied the colors and the completed look Check out the Video Below.
For more of my Airbrush Makeup Ventures:
Like on Facebook: https://www.facebook.com/Iheartairbrush
Like and Follow on Pinterest : www.pinterest.com/iheartairbrush
Follow on Instagram: Tag Krysteanea
Subscribe on YouTube: https://www.youtube.com/IHEARTAIRBRUSH
And if you are interested in the brand I use Check it out http://www.airbrushmakeup.com/shop/index.php/?acc=7e7757b1e12abcb736ab9a754ffb617a
I love airbrush makeup so much that I feel compelled to constantly spread the word in hopes that more and more people will give it a shot and eventually fall in love with it too. Today I had the chance to do my sisters makeup, yes I was the first airbrush MUA to apply airbrush makeup to her lovely skin. She is an extremely talented MUA who has constantly proved her skills as a makeup artist by traveling with her glam squad to beautify the stars in Los Angeles California. Now she loves and is addicted to traditional makeup but today she allowed me to grace her skin with airbrush makeup. So with much excitement I proceeded
I started out with a blank canvas and applied Smashbox Photofinish Primer in light to her skin concentrating to the areas that tend to be more oily. Then I applied urban decay's primer potion the original formula as a base on her eye lids. Next I applied an orange highlighter cream corrector that can be purchased at airbrush makeup.com to her under eye area to counterbalance her dark under eye circles as well as brighten them. Now it was time to apply her airbrush makeup! I began with her eye makeup applying lt. Smoke to her transition, dk. Brown to the outer corner lightly as to not make it too bold because she is pretty fair. Next I added sage green to make her deep brown eyes pop, I applied it on the lid starting at the tear duct and blending it across her lid into the dk. Brown outer corner. Next I applied her highlight using gold and adding it to her tear duct and her brown bone.
After her airshadow was complete I lined her eyes using my eyeliner stencil from airbrush makeup.com with the shade jet black. Once her eyes were complete I began on her complexion.
I started by applying peach pink to her cheek bones followed by lt. Bronze as a contor under her cheekbones and her temples as well as under her jawline. I then took lt. Golden beige and applied it in circular motions to even out her skin and provide a healthy radiant complexion.
Next I blended the lt. Golden beige down her neck and into her décolletage. Once everything was blended a lip color, lashes, and mascara was applied, and here is the finished look
Over all the airbrush makeup was beautifully natural looking evening out her skin with nothing less than a flawless radiant finish.
Airbrush is light weight, rub resistant, water resistant, hypoallergenic, and noncomedogenic. It creates a natural finish to the skin while providing exquisite coverage buildible from sheer to full. If you haven't tried it I definitely recommend that you do! You will be amazed at what it can do because with airbrush makeup the possibilities are Endless!
For more of my Airbrush Makeup Ventures: Like on Facebook: https://www.facebook.com/Iheartairbrush
Like and Follow on Pinterest : www.pinterest.com/iheartairbrush
Follow on Instagram: Tag Krysteanea
Subscribe on YouTube: https://www.youtube.com/IHEARTAIRBRUSH
And if you are interested in the brand I use Check it out http://www.airbrushmakeup.com/shop/index.php/?acc=7e7757b1e12abcb736ab9a754ffb617a
Mixing colors with airbrush makeup is a MUST, its so fun to be able to create new colors out of the colors I already have. Now instead of creating a color for immediate use, I have decided to Create my own custom color so that I can use it whenever I want.
First things first you need a color combination (ratio). The color combination that I am going to use I stumbled across when mixing colors to show how one can utilize bright colors they may have in their collection.
The colors I will be using are Sapphire Blue and Pink from Dinair's Brights Collection. I'm going to mix these colors with a one to one ratio to get this lovely purple shade.
The second item you will need is an Empty bottle with drop dispensing lid along with 2 mixing balls. Now there are mixing bottles for sale at airbrushmakeup.com for $2.00 but for now I am just going to use a bottle that I recycled from finishing a shade I had in my collection. I cleaned it out with distilled water and a q-tip along with a little citrus cleaning solution that came with my airbrush kit from aibrushmakeup.com, I also cleaned off the mixing balls as well.
Now I'm going to take Sapphire Blue and Bright Pink and add them to my empty ready to use bottle. For this mixture I am going to add Equal parts of each color to my recycled Dinair bottle.
Okay so after I added what I believe is close to equal parts ( because I just eyeballed it) I ended up with this New Custom Shade.
Now it does look a bit lighter than my initial color swatch on the paper above, so I added a few more drops after everything was said and done.
I feel like I reached the shade I was looking for!!! Mixing colors is quick and easy making creating your own custom color Even EASIER. Check out my video to see how I did it and to see how this color looks in an Airbrushed eye look!
For more of my Airbrush Makeup Ventures:
Like on Facebook: https://www.facebook.com/Iheartairbrush
Like and Follow on Pinterest : www.pinterest.com/iheartairbrush
Follow on Instagram: Tag Krysteanea
Subscribe on YouTube: https://www.youtube.com/IHEARTAIRBRUSH
And if you are interested in the brand I use Check it out http://www.airbrushmakeup.com/shop/index.php/?acc=7e7757b1e12abcb736ab9a754ffb617a
Airbrush has been used for decades to create art in different forms. Most recently It's popularity and necessity in the film industry has promoted the use of airbrush in makeup art. Creating artistic eye looks is something I've grown quite found of doing since I began using airbrush makeup. I'm constantly inspired by the amazing talented makeup artists from around the globe who are so in tuned with their artistic ability and makeup application that they are able to create art on a canvas as small as the human eyelid. Now I am one of those people who believe that anything that can be done with a brush can be done with an airbrush in some way shape or form. So I gave it a go starting small and increasing the detail in the art I attempt to create on my eyelid using airbrush makeup.
The key for me is to find some form of inspiration. Something that inspires me and create a vision in my head for what I would like to see on my eye lid.
After I have that vision I start to think about the tools I have that can make that vision possible.
Now because airbrush is more limited than using a brush at detail work especially on such a small canvas the best option I figured I had was to use stencils. Stencils are a great tool to help get the small details I want to achieve using airbrush makeup. Now I could go out and buy stencils but where is the art in that, tuning into my artistic abilities I've created a variety or stencils out of photo laminating pouches and a hobby knife set. As well as utilizing stencils for airbrush makeup application for example a shadow shield, eyebrow stencils, and eyeliner stencils. I've found that once you set your mind to something the possibilities are endless.
And with airbrush makeup the possibilities are endless also. What inspires you?
For more of my Airbrush Makeup Ventures: Like on Facebook: https://www.facebook.com/Iheartairbrush
Like and Follow on Pinterest : www.pinterest.com/iheartairbrush
Follow on Instagram: Tag Krysteanea
Subscribe on YouTube: https://www.youtube.com/IHEARTAIRBRUSH
And if you are interested in the brand I use Check it out http://www.airbrushmakeup.com/shop/index.php/?acc=7e7757b1e12abcb736ab9a754ffb617a
Do you mix colors?
If you said yes, than you are utilizing one of the best features about airbrush makeup.
If you said no, Well why the heck not! mixing colors is a way to turn 10 colors into 20+ colors! Get on it!!!
There are not too many explanations that justify why people are not mixing colors with airbrush makeup.
One being You simply didn't know that you could..... Two: You simply don't know how to.... Three: your too lazy or think its too much work/ you think its not worth it......
Mixing colors is one of the best ways to utilize colors in your airbrush makeup collection, that way no color sits there without use for months at a time. it's a great way to rotate colors and inspire new looks for the airbrush makeup user. Heck airbrush makeup is all liquid and as long as the shades you want to mix have the same base ( water based for example) there's no reason for us to not mix colors.
Say you see a tutorial on an airbrush eye look that you like, you may not have the colors the artist used but you can mix colors you already have to get as close as possible to recreating the look.
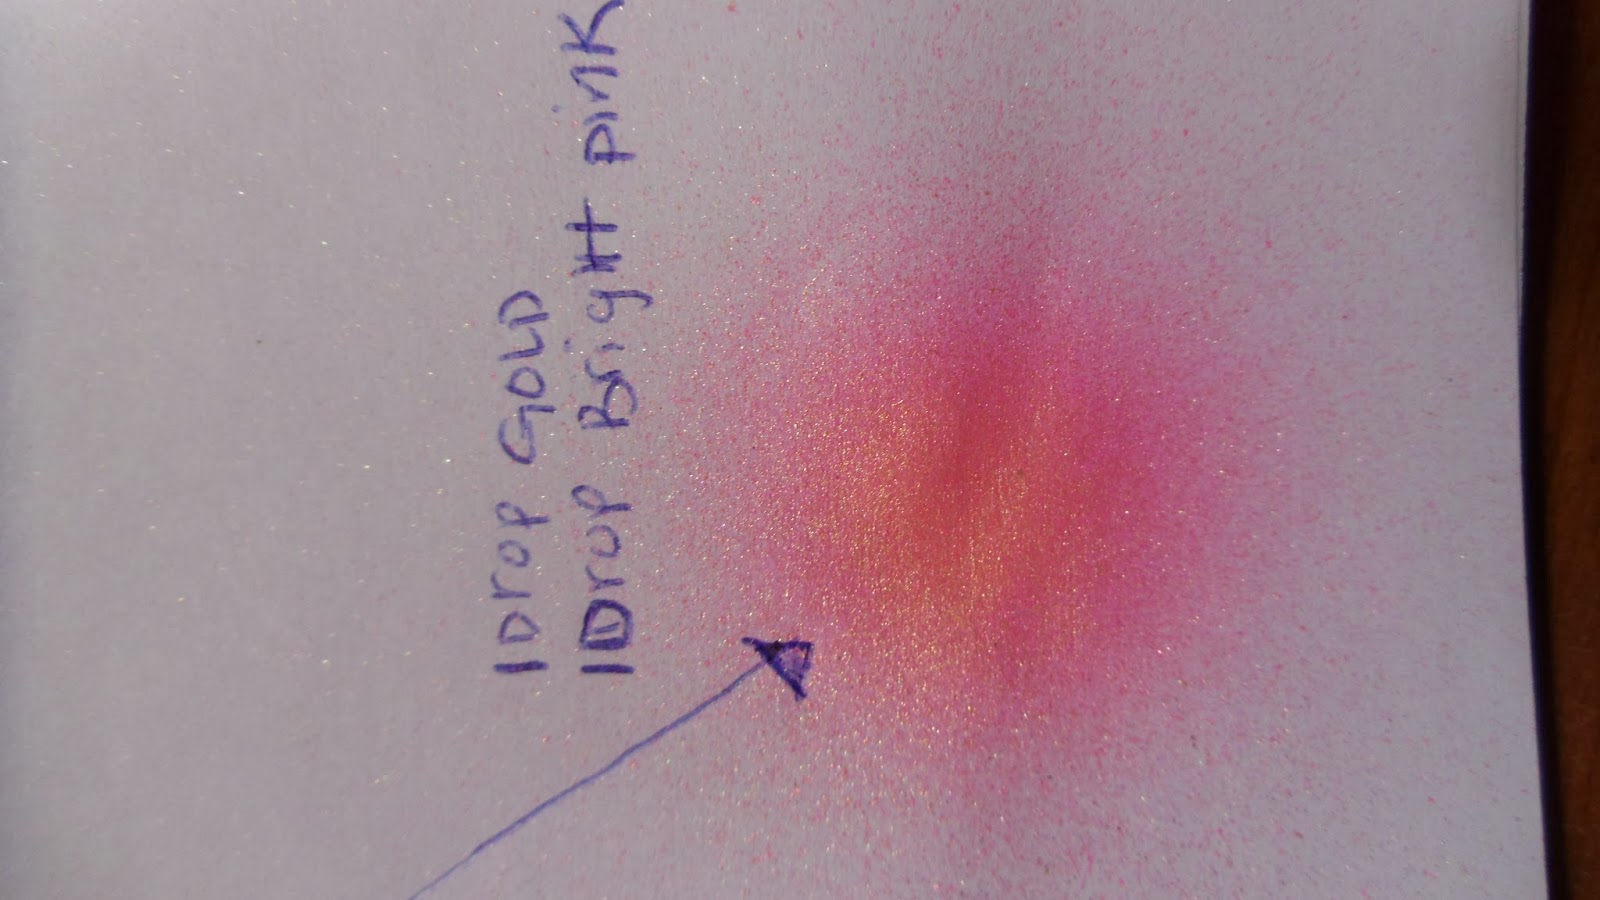
In the photo below I mixed Bright Pink with 4 other colors separately to make 4 New USEABLE shades.
The picture below is the color produced when I mixed 1 drop or Gold with 1 drop of Bright Pink.
The picture below is the color produced when I mixed 2 drops of Sapphire Blue with one drop of Bright Pink.
The picture below is the color produced when I mixed 2 drops of Lt. Bronze with 2 drops of Bright Pink.
The picture below is the color produced when I mixed 2 drops of Bronze Rose and 2 drops of Bright Pink.
So you see from the super Bright neon like pink color I was able to make 4 Shades that I can easily incorporate into my everyday eye routine. I could even use the last mixture for blush if I ever run out of my normal blush color, the Possibilities are endless with airbrush makeup.
Here are some more mixtures using Lt. Bronze as the independent variable.
I mixed lt. bronze with mauve to get the color on the left its a beautiful hue especially for used during the Christmas holiday, with dk. peach pink to get the color in the middle its a great hue for creating a romantic look its similar to a lighter rose gold I love it, and with bronze rose to get the color on the right I think this color is a great shade that can be used as an outer corner or transition color easily.
Mixing colors allow you to utilize all the colors in your airbrush makeup collection, its a feature that is specific to airbrush makeup so why not take advantage of it! airbushmakeup.com sells empty mixing bottles with mixing balls already inside so you can create a custom shade just add 2 colors using the color ratio that produced the color you like and there you go , your own personalized shade! I've done it and you should too! Why not right!!!
Here is a video that shows how I mixed the colors shown above. I hope I inspired you to start mixing colors! best wishes in your airbrush journey!!
For more of my Airbrush Makeup Ventures:
Like on Facebook: https://www.facebook.com/Iheartairbrush
Follow on Instagram: Tag Krysteanea
Subscribe on YouTube: https://www.youtube.com/IHEARTAIRBRUSH
And if you are interested in the brand I use Check it out http://www.airbrushmakeup.com/shop/index.php/?acc=7e7757b1e12abcb736ab9a754ffb617a
After using Colair for a Week I'm Confident in my final thought on the Product. All my answers to the following questions are based on my own personal experience with the product.
Do I Recomend Colair?
-Absolutely I love this product so much at this point I'm mad at myself for not trying it sooner!
How is The Staying Power of Colair:
-I found that Colair lasted twice as long as my Glamor Foundation. I kid you not this makeup line is no joke its not a gimmick, its the real deal. Trust me I have super oily skin and the makeup stuck better that the Glamor foundation even without a setting spray.
How is the Finish of Colair?
-I found that it gave me a finish that was the perfect medium between Matte and Satin. With my skin being so oily i was worried that the colair was too much of a satin finish and that on my skin after a long day of wear would make my skin look more oily than it already was. Absolutely not the case the finish was perfect fr my skin even after wearing it all day. This foundation line is like Liquid Gold it Photographs so well I LOVE LOVE LOVE the finish.
How was the Color Match with the Colair in comparison with the Glamor Line?
-The Color match initially was not spot on in comparison to the Glamor line for me. I use Dk. Golden Beige in the Glamor line and the Chart that Dinair offers for their Colair Foundations suggested that the CLOSEST match to dk. golden beige was C130. Now after using C130 I noticed that the shade was a bit darker than my neck and chest which I usually match to get the shade for my face. Was it a huge problem Absolutely not! I still used the foundation, i just had to use it on my neck and chest also. Now i was able to speak with a representative from Dinair and she suggested that I add a drop of C125 from the colair line to get closer to my natural shade. THAT'S THE BEAUTY OF AIRBRUSH MAKE UP YOU CAN MIX COLORS TO GET YOUR PERFECT SHADE DON'T FORGET THAT!!!. And this Product is So worth it so I am still super content with it.
How much of the Product do you have to use?
- With the glamor foundation i use 8-10 drops for my face to achieve the coverage that i want which is a med to full coverage, with the Colair it only took me 8 Drops to cover my face neck and chest. One word... AWESOME!!!
What type of Coverage does it offer?
-The coverage was in my opinion a medium to full coverage it is definitely pigmented enough that the range you can achieve coverage wise is anywhere form light to full easy.
What was the Texture like?
-I have to say the texture is what i love the most about this product its smooth and velvety and it definitely shows in photos. Its a huge difference from the glamor foundation, now i love my glamour foundation but i feel like i hit pay dirt with Colair. It not only looks smooth it feels smooth and for being a water base foundation free of alcohol, silicon, and talc, that is pretty amazing. LIQUID GOLD for photographs no joke!
Overall I have to say I LOVE this product I recommend it to anyone and everyone who is looking for a flawless complexion in a safe package. Check out my YouTube video on my final thoughts and you will see just how excited i am about this line!
Like on Facebook: https://www.facebook.com/Iheartairbrush
Follow on Instagram: Tag Krysteanea
Subscribe on YouTube: https://www.youtube.com/IHEARTAIRBRUSH
And if you are interested in the brand I use Check it out http://www.airbrushmakeup.com/shop/index.php/?acc=7e7757b1e12abcb736ab9a754ffb617a
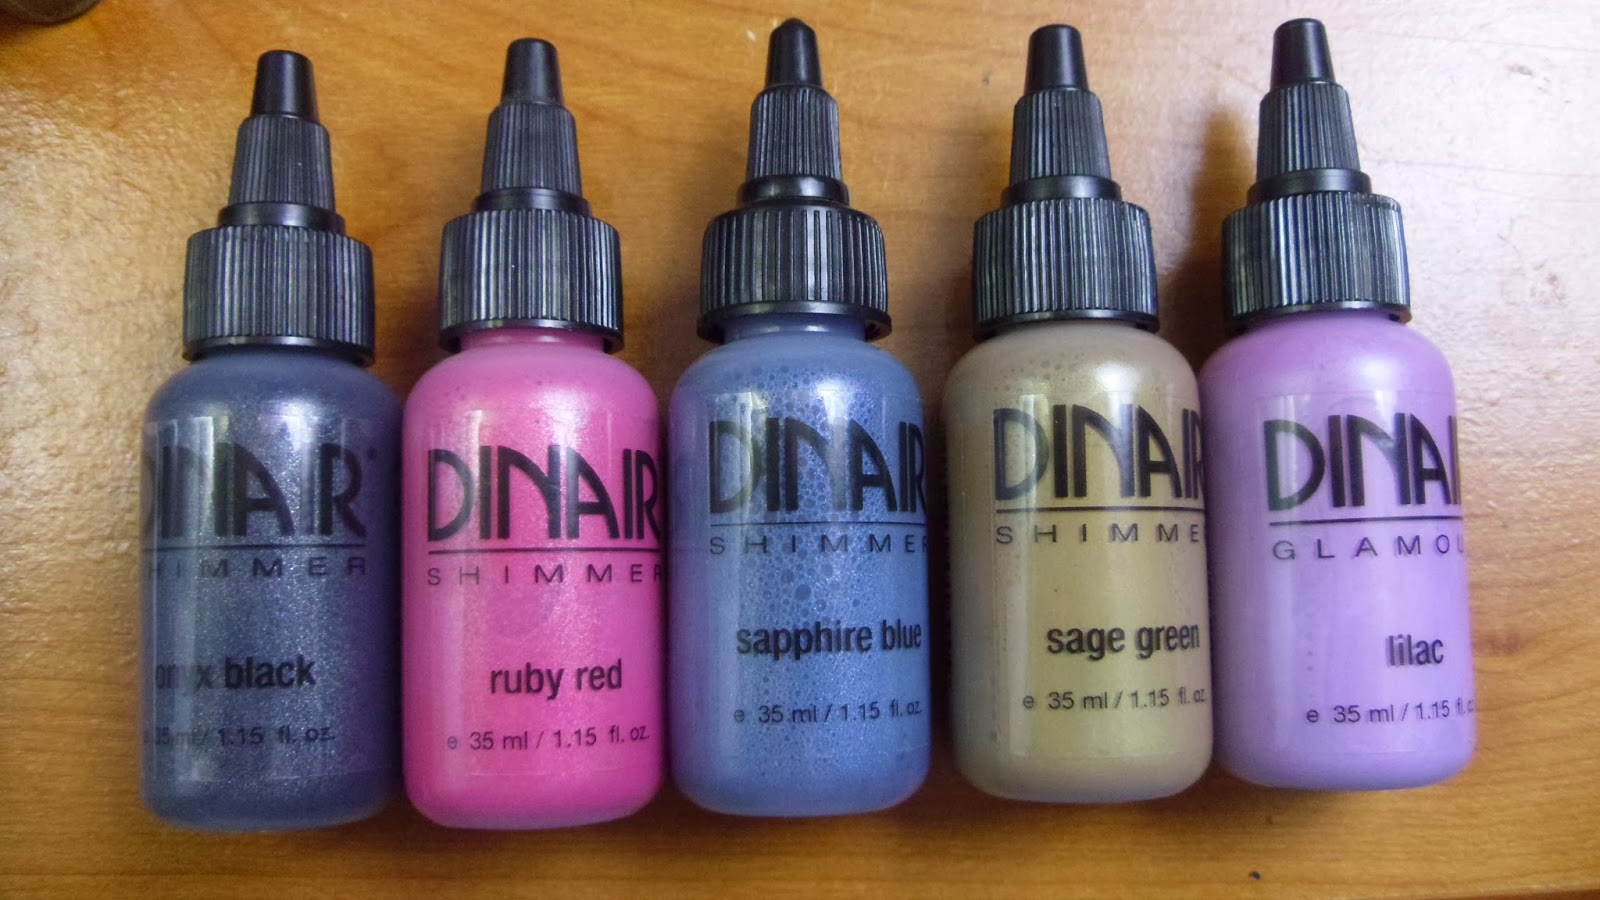
So this year like every year Dinair had awesome deals. Now if you say you cant afford it than definitely save up till black Friday or cyber Monday next year because they had deals that would have had you making out like a bandit this year. Now I'm not made of money so I had a budget for my Black Friday + Cyber Monday splurge which was $125.00... definitely going to save more for next year but you live and learn! anyways here was my haul
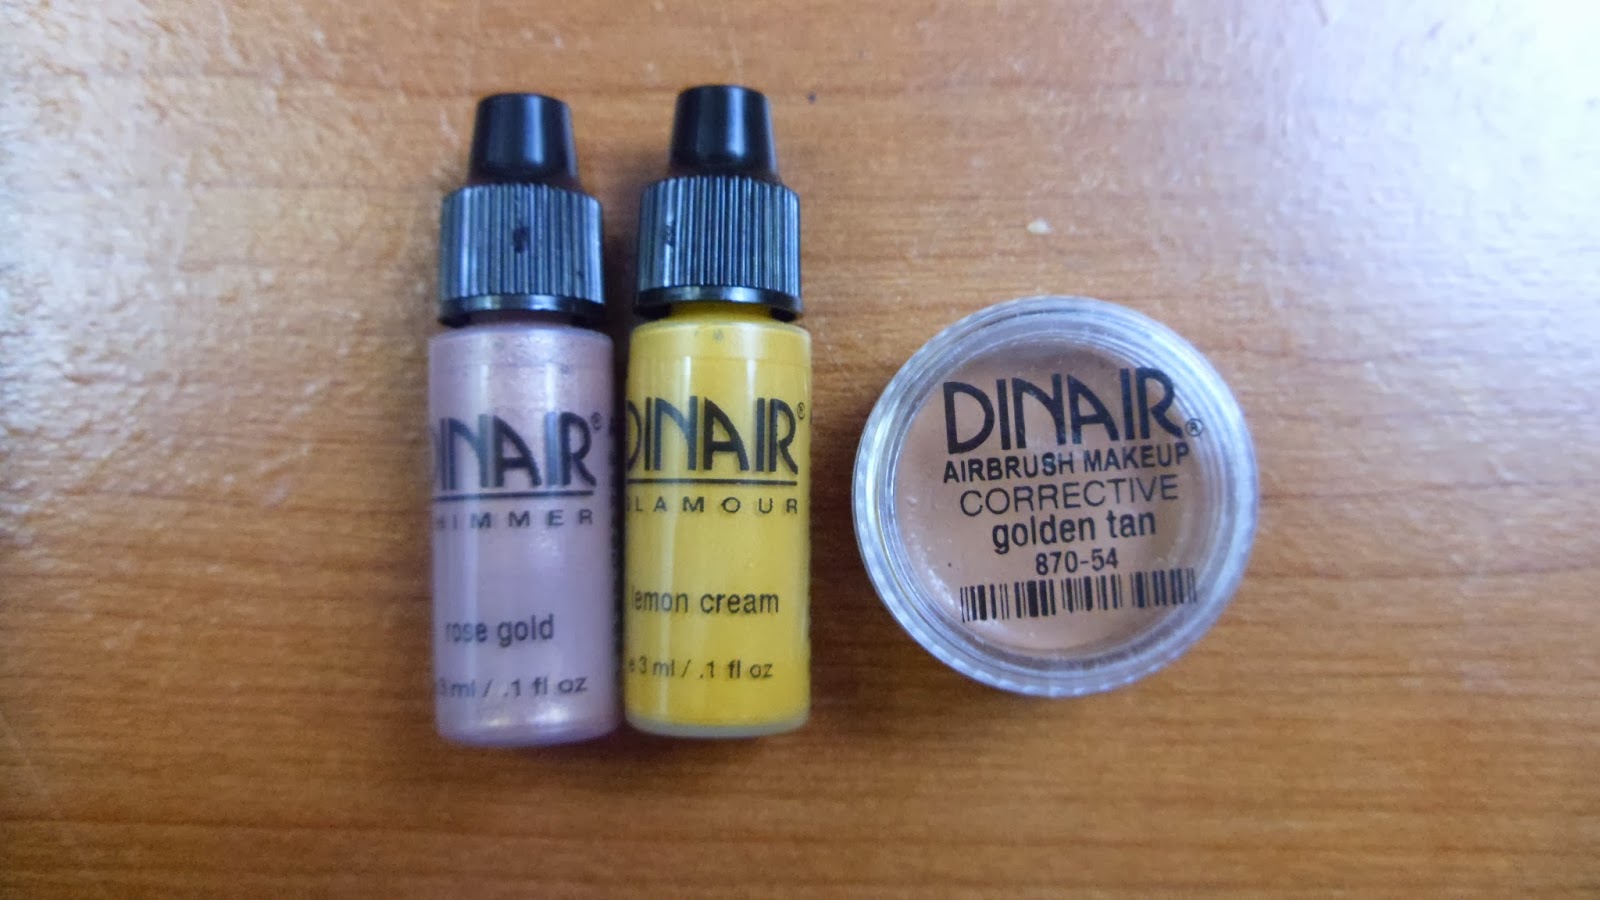
I got a Limited Edition Color Collection that included the Eyeliner Stencil Set, 5x 1.15 fl oz colors in Sapphire Blue, Sage Green, Ruby Red, Onyx Black, and Lilac, Colair Shade C130 similar to Dk. Golden Beige in the Glamor Line, and a Sample of Golden tan concealer, Lemon Cream, and Rose Gold. Now it may not seem like much to some people but its a huge savings!
HOW MUCH DID I SAVE?
lets take a look starting with the 5x 1.15 fl oz colors, Regular price for this size color is $25.00 I got each for 6.25 soooooooo $125.00 would have been the regular price for just the 1.15 fl oz bottles but I only paid $31.25 Massive saving with that alone.
Next is the Woodland Whimsy Limited Edition Color Collection. It came with 5 shades and Dinair's eyeliner stencil set, now the set retailed at $72.00 if I'm not mistaken and I purchased it for $49.99 a savings of $22.01. The Set includes 3 Limited Edition Shades Safari, Majesty, and Nectar, as well as 2 Eyeliner Shades in Dk Brown and Midnight Blue. The Collection also Came with Dinair's Eyeliner Stencil Set a $12.00 Value.
Dinair was offering all Makeup at 20% off that include the new Colair Line so I defiantly took advantage of that and purchased C130 which is closest to my foundation shade of Dk. Golden Beige in the Glamor line. Regular price $18.00 Sale Price $14.40. Not much but in my book Every Penny Counts.
And Lastly I got Samples of Dinair's Concealer Golden Tan, Shade Lemon Cream, and Shade Rose Gold. Samples are always great so Get them if you can!
All in all I saved around $90.00 without the deals I would have ended up paying $215 dollars + tax and Shipping. I Sure do love Holiday Sales!
Like on Facebook: https://www.facebook.com/Iheartairbrush
Follow on Instagram: Tag Krysteanea
Subscribe on YouTube: https://www.youtube.com/IHEARTAIRBRUSH
And if you are interested in the brand I use Check it out http://www.airbrushmakeup.com/shop/index.php/?acc=7e7757b1e12abcb736ab9a754ffb617a
Dinair Airbrush Makeup released a new color line this year called Colair. Now I'm sure there are makeup enthusiasts and Artists who have a few questions about this new line. For Example
What makes Colair different from the other makeup lines that Dinair offers?
from my inquiries at Airbrushmakeup.com if found that Colair is more Pigmented, has a luxurious finish, provides better coverage,contains no oils or parabens, its silicone free, alcohol free, and Talc free.
If I have the Glamor Colors Why would I Purchase Colair?
Colair I found is the only water based airbrush makeup that has a medium to full coverage ( based on my personal experience using the product). It also provides a smooth velvety finish that the glamor or paramedical lines don't have. so its all about your preference and if you personally want to use this line.
Do the Colair Colors Correspond with the colors in the Glamor line?
Dinair claims that they do, my opinion is to an extent. Now when I say "to an extent" I mean that the colors are not an exact match to the colors in the glamor line but they are pretty close. At airbrushmakeup.com Dinair has a color chart of the shades in the Colair line. If you look closely at the foundation shades you will see that under the color # (example c130) there is an * followed by the color that that shade corresponds to in the Glamor line. The * as Dinair has noted at the bottom left corner of the chart marks the colors from the glamor collection as a CLOSEST MATCH, not EXACT so keep that in mind if you decide to order colors from this color line. In my opinion Dinair always offers its customers the tools they need to be successful at airbrush makeup, that being said they also noted on the lower right corner of the chart what undertones the different Colair shades have.
Cool tones end in odd numbers, Warm tones end in even numbers, and Neutral tones end in either the 0 or 5. Huge tip when it comes to color matching, you wouldn't want someone with a warm undertone wearing a shade with a cool undertone now would you? of course not!
My First Impression:
In the Glamor line my Foundation shade that is the Best match to my natural skin tone is Dk. Golden Beige, This shade has a yellow undertone similar to that of my natural skin tone making it the perfect shade for me. To get my Colair color I followed the chart and chose C130 which is the closest match to Dk. Golden Beige. here is what the two colors looked like when I put them side by side
As you can see my Shade from the glamor line clearly has a yellow undertone and my selected shade from the Colair line looks much lighter with a neutral undertone. So i did a drop test on a tissue to see if the Colair shade was as light as it looks and to test if it was more pigmented as Dinair claims it is
The results are as showed in the image above. Even though the Colair color looked lighter it actually was close to Dk. Golden Beige from the glamor line, I still saw a difference in the undertone which I knew before I purchased it due to Dinair leaving the tip on the color chart about undertones that this shade was a neutral undertone but I didn't worry too much about it. Now as for Pigmentation....Colair is defiantly more pigmented the drop on the right is Colair and as you can see it didn't spread like the drop on the left which is Dk. Golden Beige from Dinair's Glamor line.
So now we know what the color looks like on a tissue lets see how it looks on me... here is a photo of my skin before Colair-
You can see that my Face is significantly lighter than my neck and chest and I have acne scars and marks on my cheeks, Notice the yellow undertone on my neck and chest that is not present on my face now a days. My goal in using foundation is to get my face to match my Neck and Chest.
Here is a picture of my skin after I applied C130 from Colair-
Definitely evened out my skin tone, the finish looks very smooth, not Matte but not Satin. I have to admit I really like the finish it feels soft and smooth and the coverage proved to be medium to full in my opinion. It only took 6 drops of Colair to cover my face, unlike the 8 drops it takes my Glamor foundation to cover my face. And the coverage is definitely pretty Flawless.
Now the only issue I had with Colair is shown below-
The finish is awesome, the shade is fairly close, But it is not quite a match you can definitely see where my skin starts and the Colair ends. Now I used 5 more drops of Colair to cover my neck and chest after realizing that my face appeared to be darker. Now it was not Darker like the wrong shade, but darker as in it looked like I had gotten a slight tan. so if I were to use the Colair on a daily basis I would have to incorporate my neck and chest into my routine unlike the Dk. Golden beige in the glamor line that matched my chest only requiring me to cover my face and blend down to my jawline and under my chin.
Overall The Colair Collection is Promising, it definitely delivers what it says it does and I would recommend that this product at least be tried seeing as that Dinair offers 3 ml (Sample size) bottles at $9.00 in my opinion a perfect trial size. I know it doesn't seem like much but those small sample sizes go a long way.
Here is the Video of my first impression from my channel
Stay tuned for my Review of C130 from the Colair line focusing on if it is a LOVE it or LEAVE it Coming Soon!
Like on Facebook: https://www.facebook.com/Iheartairbrush
Follow on Instagram: Tag Krysteanea
Subscribe on YouTube: https://www.youtube.com/IHEARTAIRBRUSH
And if you are interested in the brand I use Check it out http://www.airbrushmakeup.com/shop/index.php/?acc=7e7757b1e12abcb736ab9a754ffb617a
Airbrushing with bright colors can be tough sometimes, take me for example I'm not too big on using bright colors in my airshadow routine but when I am shopping for new colors I always manage to get one or two bright colors. Guess what happens to those colors as soon as I get them in the Mail.... I look at them, admire them, and than they sit in my airbrush kit. Total waste I know, so how can I incorporate those colors into my everyday routine?
My first though was use them as an accent color! Yes an accent color adding the bright colors and layering colors I'm used to over it enough so that only a certain amount of the bright color shows through, Enough to make it the perfect pop of color. You could even reverse the placement by adding the color to just your tear duct and inner corner of your upper and lower lash line very close to the tear duct of course.
My second thought is to use the bright color as a lower lash line liner. That's a trend that has been steady for a while and would be an awesome way to add a pop of color without being overwhelmed by it. Or opposite placing like as a pop parallel to my eyeliner. Let me explain what I mean, first I would finish my airshadow.... Than I would line my eyes thicker than I normally do with the bright color, than line my eyes like I normally do for a retro pop of color.
My final thought was to mix it. Yes mix it with another color that will help tone it down to a shade that I would feel more comfortable using.
There are many ways to utilize the things you have why should airbrush makeup be any different. So I hope you would take what u have and play around with it to see what's the best use of the color. The possibilities are endless and you never know what u will discover!
Like on Facebook: https://www.facebook.com/Iheartairbrush
Follow on Instagram: Tag Krysteanea
Subscribe on YouTube: https://www.youtube.com/IHEARTAIRBRUSH
So I recently purchased Skindinavia's Bridal Makeup Finishing Spray
because I have very oily skin I wanted to find a setting spray or
something of the sort that will decrease the amount of oil that plagued
my skin throughout the day as well a keep my makeup from transferring
towards the end of the day. Yes airbrush makeup promises all day wear
without transferring, but if you know about skin and the oils that you
face secrets, than you know that the natural oils produced has the
ability to change the composition of whatever you put on. So don't blame
the airbrush makeup if it doesn't last all day on your face because you
have very oily skin.
Anyways I decided to go with skindinavia after doing research on the top makeup setting sprays available.
After it came in I'm was eager to try it so i filmed a video review of my first impression of the product. Check it out...
So after I put it to the test I have come to the Conclusion that this product is true to its purpose.
As far ask keeping my makeup in place it did a wonderful job! my makeup did not transfer at all throughout the day. As far as controlling my oils... I couldn't feel my skin getting oily at all. I was constantly having to ask my family members if my skin looked oily throughout the day, simply because I couldn't feel the oils coming through, now I did show some shine at the end of the day while filming my first impression but it was not even close to the amount of oil that normally comes through on a regular basis. all in all I will have to continue the use of this product before I can decide if I love it or not but for now I am definitely putting it on my favorites list, especially when it comes to products that work in conjunction with airbrush makeup.
If you are interested in this product you can find it at HTTP://www.Skindinavia.com
Like on Facebook: HTTP://www.facebook.com/iheartairbrush
Follow on Instagram: Tag Krysteanea
Subscribe on YouTube: Http://www.youtube.com/IHEARTAIRBRUSH


.png)